The Roster Uploader feature allows the user a convenient way to add multiple users or change all the users' statuses at one time, without having to select them individually.
Download an annotated Roster Uploader Template to serve as a guide. We do recommend downloading the most recent 'XLS Upload' file from the site so you have any new fields that have been added.
- The Roster Uploader feature can be accessed in the Advanced View by hovering over the Learning Object dropdown menu and selecting Courses>Class Count.
- Under the “Class Count” column click “View”, then click the “Roster” link on the class instance to add or update users.
- From the "Session List" screen, which displays the roster of the course instance, is where to access the roster uploader spreadsheet. Click on the Actions button.
- Click the Multiple User Upload button to open the spreadsheet either in the browser or to download to your computer (depending on your browser setting).

- Download the Roster Uploader Excel spreadsheet to your computer, if not already done.
The below sections reference the Roster Uploader Template. It has the descriptions for each column and when to use each field.
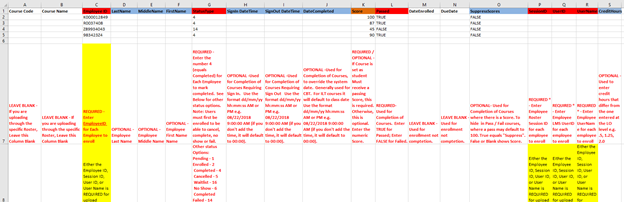
Sheet #1 – Roster Uploader Template
The first tab is an example of the Roster Uploader spreadsheet showing the required fields / columns highlighted in red, i.e. – Employee ID* and StatusType

*Note – Either the Employee ID, User ID, or Username is a required field to Enroll a user.
Sheet #2 – Roster Uploader Template
The second tab is an example of the columns, status numbering, and optional fields to Enroll users in the course.

Detailed explanation of columns, below:
- Course Code – LEAVE BLANK - If you are uploading through the specific Roster, leave this Column Blank
- Course Name - LEAVE BLANK - If you are uploading through the specific Roster, leave this Column Blank
- Employee ID – REQUIRED* - Enter the EmployeeID for each Employee you want to Enroll
Either the Employee ID, User ID, or User Name is required for upload
- LastName - OPTIONAL - Employee Last Name
- Middlename - OPTIONAL - Employee Middle Name
- FirstName - OPTIONAL - Employee First Name
- StatusType - REQUIRED - Enter the number 2 (equals Enroll) for each Employee you want to Enroll
- Pending - 1
- Enrolled - 2
- Completed - 4
- Cancelled - 5
- Cancelled by Admin - 11
- Waitlist - 16
- No Show - 6
- Completed Failed – 14
- SignIn DateTime - LEAVE BLANK - During Enrollment - Used for Completion of Courses requiring Sign In
- SignOut DateTime - LEAVE BLANK - During Enrollment - Used for Completion of Courses requiring Sign Out
- DateCompleted - LEAVE BLANK - During Enrollment - Used for Completion if you want to override system date / time for online course or class instance time for Instructor Led Classes
- Score - LEAVE BLANK - During Enrollment - Used for Completion of Courses where a Score is Expected
- Passed - LEAVE BLANK - During Enrollment - Used for Completion of Courses
- DateEnrolled - OPTIONAL - Used to add a specific date / time of enrollment other than the system date / time. Use the format dd/mm/yy hh:mm:ss AM or PM e.g. 08/22/2018 9:00:00 AM (if you don't add the time, it will default to 00:00). Often used when back dating enrollment such as when enrolling users in bulk after a course has already completed.
- Duedate - OPTIONAL - Used to add a due date to computer based courses. Use the format dd/mm/yy hh:mm:ss AM or PM e.g. 08/22/2018 9:00:00 AM (if you do not add the time, it will default to 00:00).
- SuppessScores - OPTIONAL- Used for Completion of Courses where there is a Score. To hide in Pass / Fail courses, where a pass may default to 100. TRUE equals "Suppress". FALSE or Blank shows a Score.
- SessionID - LEAVE BLANK - During Enrollment and REQUIRED * - During Completion of Courses
Either the Employee ID, Session ID, User ID, or User Name is required for upload
- UserID - REQUIRED * - Employee LMS User ID
Either the Employee ID, User ID, or User Name is required for upload
- Username - REQUIRED * - Employee User Name
Either the Employee ID, User ID, or User Name is required for upload
- CreditHours - LEAVE BLANK - During Enrollment Used for Completion of Courses
- Enter the required and/or optional fields into the Roster Uploader spreadsheet and save to your computer.

NOTE – This is a 2-step process were the users have to be first Enrolled into the course (where the statustype = 2), then the roster uploader has to be updated and the steps have to be repeated to Complete them in the course (e.g. statustype = 4). - To upload the Roster, click the "Choose File" button to find the saved file.

- Choose the file to upload and click "Open".

- Click the Upload/Update Roster button.

- Review the roster to confirm the users have been enrolled with the correct status and data.
The roster uploader can also be used to complete users in a course instance. If a passing score is required, enter it in the “Score” column (K) and “True” must be entered in the “Pass” column (L). This will result in a complete status. It is optional to enter a non-passing score in column (K) and “False” under column (L).
*Note – Either the Employee ID, Session ID, User ID, or Username is a required field when completing a course.
Sheet #3 – Roster Uploader Template
The third tab is an example of the columns, status numbering, and optional fields to Complete users in the course.
- Update the Roster statustype column in the spreadsheet to Complete the users in the course and repeat steps 6 to 9 above.