The Users Feature allows the CSA / Admin to add, edit and manage user information in the LMS.
Generally, Users are created automatically as part of the daily User Import Service where the latest organizational HR / ERP data is imported into the LMS system. Administrators, however, do have the capability of adding and editing User information directly.
To access the Users Feature:
Navigate to the Advanced View, hover over the User Management dropdown menu and select Users.
This will bring up the User List which provides a listing of all Users in the LMS system.
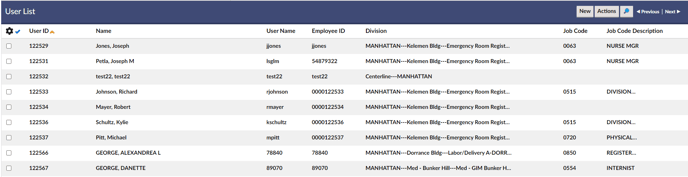
Explanation of Columns: User List
- - Column of checkboxes allows selection of single or multiple Job classes.
- User ID - LMS System generated ID based on order of creation.
- Name - Name of User, usually in order Last name, First name, Middle name or initial
- Username - Unique User Name which is used throughout system for associating this user with various objects.
- Employee ID - ID of user as existing in company's HRIS System.
- Division - Primary LMS division / department of which the user is a member.
- Active - Indicates whether the user account is active (Yes) or inactive (No)
- Last Name - Last name of User
- First Name - Last name of User
- Hire date - (Not shown in above view) User's Hire Date.
- Job Code - User's Job Code.
- Job Class - User's Job Class.
- Job Position - User's Job Position.
- Delete - Red (X) icon. If available (usually not available) and clicked, it will ask for confirmation to delete User.
How to Sort, Search and Navigate the User List
Some of the most used and powerful capabilities of the Users Feature center around the ability to find individual or groups of users meeting specific search criteria, searching these users and sorting these users cultivated from the thousands or tens of thousands (or more) found in the original User List.
Column Headers - Sorting Function
Non-filtered or filtered search results can be sorted by alphabetically by individual column types by clicking on the associated column header (except for checkbox and delete columns). Click once for an ascending search and click a second time for a descending search.
All / A- Z / Other Filters
In the top left corner, just below the title "User List" are the word "All", the individual letters A-Z and the word "others". These single click filters allow for quick filtering by the starting letter (or non-letter if "Others") of the Name field. For example, click "T" and all names beginning with the letter "T" will be selected. Click "All" to clear the individual filters and select all users.

- Field Search dropdown menu provides a listing of common user profile features to search.
- Text Search Box - allows you to enter the term to search.
- Search Link- once a field is chosen and text search has been entered, click to filter by these search parameters.
- Clear Link - only available after a search has been performed, allows you to clear search filtering and show all results from which a new search can be done.
Note: Each successive search is a sub-search using existing results only unless the clear link is selected.
To use the user search:
- Use the Field Search dropdown menu and select a user profile field to search. For example, "First name".

- Enter the specific search term you wish to search by in the Text Search Box.
Note: Searches are "includes" searches, so a search for "Rob" would yield "Rob", but also "Robert", "Roberto", "Robin" etc. - Click Search.
- A filtered result set will appear.
- To sub-search within this result set, follow steps 1 -3 with additional search info.
- To reset and enable another search from the full group, click the Clear Link.